Showing posts with label DIY. Show all posts

Feb 18, 2014

Nail Art Practice sheet

Just a little quick and short blogpost, but I think it will help you a lot, just like it helped me! ;)

If you make nail art regularly, this is a nice tip. I found this through google search and I wanted to share it with you.
It's a nail template with all empty nail shapes. And I find this very usefull for thinking what kind of nail art you want to make. This way you don't just start painting onto your nails just to find out it doesn't look good. 

The Template I found and think is very usefull is the following


I printed this out multiple times and just started drawing. It's a fun and easy way to create nail art. 

The link to this image: NailArtPracticeSheet

Have fun painting and creating,

xoxo

Dutchnailss

Nov 22, 2013

#26 Baby blue nails for my sister

You can call me an aunt now! :D 

A month ago, my sister gave birth to a baby boy. He's a beautiful little boy and I love him already! 
For this, I made a nailart with a baby blue and a darker blue. The design is easy to recreate with a striper or a toothpick. 


The polishes I used for this look are the following:


If you feel inspired by this look and recreate it, I would love to see what you did! If you have instagram, just use the hashtag #dutchnailss and I will see your design! :D

I made a tutorial for this manicure. If you want to see exactly how I did this you can click right here and you'll go to my youtube channel.

Extra info
----------------------------------------------------------------------------------------------------------------------------

Youtube: http://www.youtube.com/user/Dutchnailss

Instagram: http://instagram.com/dutchnailss# 

Weheartit: http://weheartit.com/Dutchnailss

Twitter: https://twitter.com/TheDutchnailss

Facebook: https://www.facebook.com/Dutchnailss

Oct 30, 2013

#22 Smiley Faces

Sweet, happy and pink smiley faces!

I made these a while back, didn't liked the result and decided not to post them online. After a few times looking at the pictures of this mani I changed my mind. I'm still not really happy about the endresult, but hey I'm not perfect and my nails arent either ;)

I'm from the Netherlands and when I started this blog I wrote all the blogs in dutch. At that time I made a smiley face how to, with step by step photo's. And now my blog is in english I wanted to add a video tutorial! Just because I find seeing someone actually painting her nails easier than copying a design from a photo. 

    
The polishes I used are


If you feel inspired by this look and recreate it, I would love to see what you did! If you have instagram, just use the hashtag #dutchnailss and I will see your design! :D

I made a tutorial for this manicure. If you want to see exactly how I did this you can click right here and you'll go to my youtube channel.

Extra info
----------------------------------------------------------------------------------------------------------------------------

Youtube: http://www.youtube.com/user/Dutchnailss

Instagram: http://instagram.com/dutchnailss# 

Weheartit: http://weheartit.com/Dutchnailss

Twitter: https://twitter.com/TheDutchnailss


Oct 20, 2013

#21 Halloween water marble

Messy Halloween Water Marble

Here's another Halloween inspired manicure! A messy water marble. I deliberately choose to make this water marble not so neat and tidy just because I thought Halloween isn't about things being neat and tidy ;) 

After I finished filming this manicure, I really didn't like the endresult. I thought it looks awful and like someone who never ever ever had done water marbling did my nails. But after a few times, I got used to the look and started to like them. Then I decided to edit the clips and make a tutorial for this manicure, even after I wasn't planning to. 

 
I like the way my index and tumb turned out. Sadly some bubbles popped and you can see the white polish on some spots. But hey, that's a risk with water marbling :)

The polishes I used for this manicure


In the tutorial I already had painted my nails with a base and a white polish. And I taped my nails to help with the clean up afterwards. I will post a tutorial on how I tape my nails soon! 

If you feel inspired by this look and recreate it, I would love to see what you did! If you have instagram, just use the hashtag #dutchnailss and I will see your design! :D

I made a tutorial for this manicure. If you want to see exactly how I did this you can click right here and you'll go to my youtube channel.


Extra info
----------------------------------------------------------------------------------------------------------------------------

Youtube: http://www.youtube.com/user/Dutchnailss

Instagram: http://instagram.com/dutchnailss# 

Weheartit: http://weheartit.com/Dutchnailss

Twitter: https://twitter.com/TheDutchnailss

Oct 8, 2013

#19 I'm A Barbie Girl!

Come on Barbie, let's go party!


I'm on instagram, and at the end of the month september I saw a picture of the month october beign the month for breast cancer awareness. And I wanted to participate in this. I don't know any women who have this terrible disease. But either way it's important that people raise awareness of this disease. And my way of doing that is to join 'Polish Us Pink' for the month of october.


This is the first pink manicure I made for this month


And as always, I didn't knew how I should name this manicure. I asked my best friend what she thought of when she looked at this manicure. And she answered 'Barbie!'. I immediately got the song Barbie girl stuck in my head. So that's why I called this manicure 'Come on Barbie, let's go party!' If you don't know the song(I don't think much people do) This is the song (It's a link!) 


The polishes I used for this manicure are 


If you feel inspired by this look and recreate it, I would love to see what you did! If you have instagram, just use the hashtag #dutchnailss and I will see your design! :D

I made a tutorial for this manicure. If you want to see exactly how I did this you can click right here and you'll go to my youtube channel.


Extra info
-------------------------------------------------------------------------------------------------------------------------

Youtube: http://www.youtube.com/user/Dutchnailss

Instagram: http://instagram.com/dutchnailss#  


Weheartit: http://weheartit.com/Dutchnailss


Twitter: https://twitter.com/TheDutchnailss

Oct 4, 2013

#16 Zipper Nail art!

Pink and blue zipper nails!

 So I don't know what I need to say about this design. All I can say is that this is a super easy and cute design. It won't take a lot of time to make this and it just looks cute! 


The polishes I used are


If you feel inspired by this look and recreate it, I would love to see what you did! If you have instagram, just use the hashtag #dutchnailss and I will see your design! :D

I made a tutorial for this manicure. If you want to see exactly how I did this you can click right here and you'll go to my youtube channel. 


Extra info
-----------------------------------------------------------------------------------------------------------------------------------


Youtube: http://www.youtube.com/user/Dutchnailss

Instagram: http://instagram.com/dutchnailss# 

Sep 15, 2013

Black & White challenge! part 8! #13

Mix 'n Match

 Using a small amount of scottish tape, a make up sponge and a small dottingtool I made this look. I really liked the way this mani turned out! I had a idea in my head to use the scottish tape and the make up sponge to make a design on all my nails. But when I finished this on my nails, I didn't liked the result. I don't know if it was because I only used black and white polishes, or that I didn't like the fact that all my nails looked exactly the same.

After removing the failed design on my nails, I decided to do something different on every nail. One with some small dots, one with the scottish tape and the make up sponge and to finish the look one with glitter! You can never go wrong with a glitter accent nail! ;)


And this is what I came up with


The nailpolishes I used are named below


If you feel inspired by this look and recreate it, I would love to see what you did! If you have instagram, just use the hashtag #dutchnailss and I will see your design! :D

I made a tutorial for this manicure. If you want to see exactly how I did this you can click right here and you'll go to my youtube channel. 


Extra info
-----------------------------------------------------------------------------------------------------------------------------------


Youtube: http://www.youtube.com/user/Dutchnailss

Instagram: http://instagram.com/dutchnailss# 

Sep 6, 2013

Black & White challenge! Part 7! #12

Black, White and Gold


For this manicure I used some thin pieces of tape.If you don't own these kind of tapes you can cut normal scottish tape in small strings. 


This is a super easy design to make. But you do have to wait for the first layer of polish to completly dry!! Because if you don't and you put the tape strings on the polish you will ruin the nailpolish and you can start all over again. 

If you want to see the tutorial you can click right here and you will go to my Youtube channel! 

Also, if you follow me on Instagram, you'll get notiched when I upload new videos and I post a lot more photo's on my instagram: Dutchnailss

The polishes I used for this look are:


Hope you like the look!

Aug 25, 2013

Black & White Challenge! Part 6! #11

I'm getting near the end of the Black and white challenge list. But not quite yet! :)

After this one I'll still have four more Black & White mani's to create and share with you!

This time I had to make something with a colorfull base and white decorations. So I made these adorable sheep nails inspired by the amazing JuliaMll 


If you want to see the tutorial I made for this mani, click right here to go to my Youtube channel. The exact names of the polishes are listed below


Aug 21, 2013

#10 Neon mani!

Neon, neon neon!


This mani really pops! The bright colors of the neon polishes on the white make this a bright and sweet manicure. It's super easy to create and looks super cute!

Click here to go to the tutorial on my channel!

The products I used are listed below


- base coat
- a white polish

- large and small dottingtool
- Safari neon pink
- Safari neon yellow
- NYC Black out
- Da Vinci pastel green
- NYC top coat

Aug 11, 2013

Black & White challenge! Part 5! #8

The next tutorial in the Black & White challenge series! 

 This time the challenge was to make a design with a black base and color ontop. 

 The little black dot on my ring finger is not a dot of polish. It's a little black rhinestone. I had bought some a long time ago but never tried something with them. I saw them lying on my wardrobe before I started filming the tutorial of this look. And I decided to use them in this design. 

To watch the tutorial click right here to go to my Youtube channel

The polishes I used on this design are listed below


- base coat,
- NYC City Blackout
- a nameless lightblue polish
- two black teardrop shaped rhinestones
- top coat  

Black & White challenge! Part 4! #7

It has been quite some time since I last postd a tutorial. I have been really busy and just didn't had the time to edit. I filmed it some days ago and now i finally got the time to edit the tutorial and upload it on Youtube! 

Part four of the Black & White challenge: A white base with color. And this is what I made for this challenge


You can watch the tutorial on this design if you click right here!

The products I used on this design


Black & White challenge! Part 3! #6

I MADE A MISTAKE! OH NOOO!

This nailart should be a black base with colors design (the third one on the challenge list) But for some reason my mind just decided that I should do a color base with black (which is the fifth challenge on the list) And I made this


And I didn't even noticed I made a mistake until I finished editing the how-to of this nailart... sigh...

But then I decided to just switch the two challenges. This way I can keep this nailart on my nails and I already had a hard time thinking about what I should make with a black base and color. So now if have some more time to think about that and in the mean time, I have this amazing tiger look on my nails!

So the list you saw on the first post when I started this challenge is slightly changed. The third challenge became the fifth and the fifth challenge became the third challenge, as easy as that!


Even though I wasn't supposed to do this nailart. I still like it a lot! I chose two intense colors for this look. Both are polishes from Catrice. These polishes were a limited edition and I just had to have them :)

If you want to see how I made this design click here

The polishes I used to create this look are listed below


- A base coat,
- Catrice: I'm a survivor
- Catrice: Like a jungle drum
- NYC: City Blackout

- Top coat. 
 

Aug 9, 2013

Black & White challenge part 2! #5

My second nail art design of the Black & White challenge!

This time I had to make a design with a black base and white decorations.

I had a really hard time to come up with a design, I just couldn't think of a design to make with a black base and white decorations. But I eventually came up with this design

I think this is a real classy and at the same time cute design. I used black and white (of course) because this was the point of the challenge. But I think this design will look good in colors too! Maybe just in blue colors, or in multiple colors! This design can be made in many ways! That's the way I like it ;)

If you would like to see how I made this design. Click here to watch it!

Aug 5, 2013

Black & White challenge! Part 1! #4

I had so many ideas for DIY's that I didn't knew where to start! And I just couldn't decide what to paint on my nails :(

I was browsing on the internet and found some nailart challenges. This was what I needed! So I decided to start with the Black & White 10 day challenge!


I choose this challenge because I really love designs with just black and white polish.
I'm not doing a different design every day, because I don't think my nails would like to be harassed by nailpolish remover everyday ;)

So I just do a different desing every two or three days. 

This is the first one of the challenges: the White base with black. And this is what I came up with


I made a howto video of this look! You can watch it if you click right here. I hope you like it!

Aug 3, 2013

#3 Blocky Colors!

Here's another one! A new DIY

A colorful and fun design! It may look like it took ages! But it really is a quick and easy design to paint on your own nails! 

If you click right here you will go to my Youtube channel to watch the howto!

The colors I used are listed below:

- Base coat
- Pastel yellow: Vanille love by Catrice
- Black polish
- Pink: Wheels on fire by Catrice
- Lighter pink: The Salmon Dance by Catrice
- Green: Green Days by Catrice
- Top coat


Jul 30, 2013

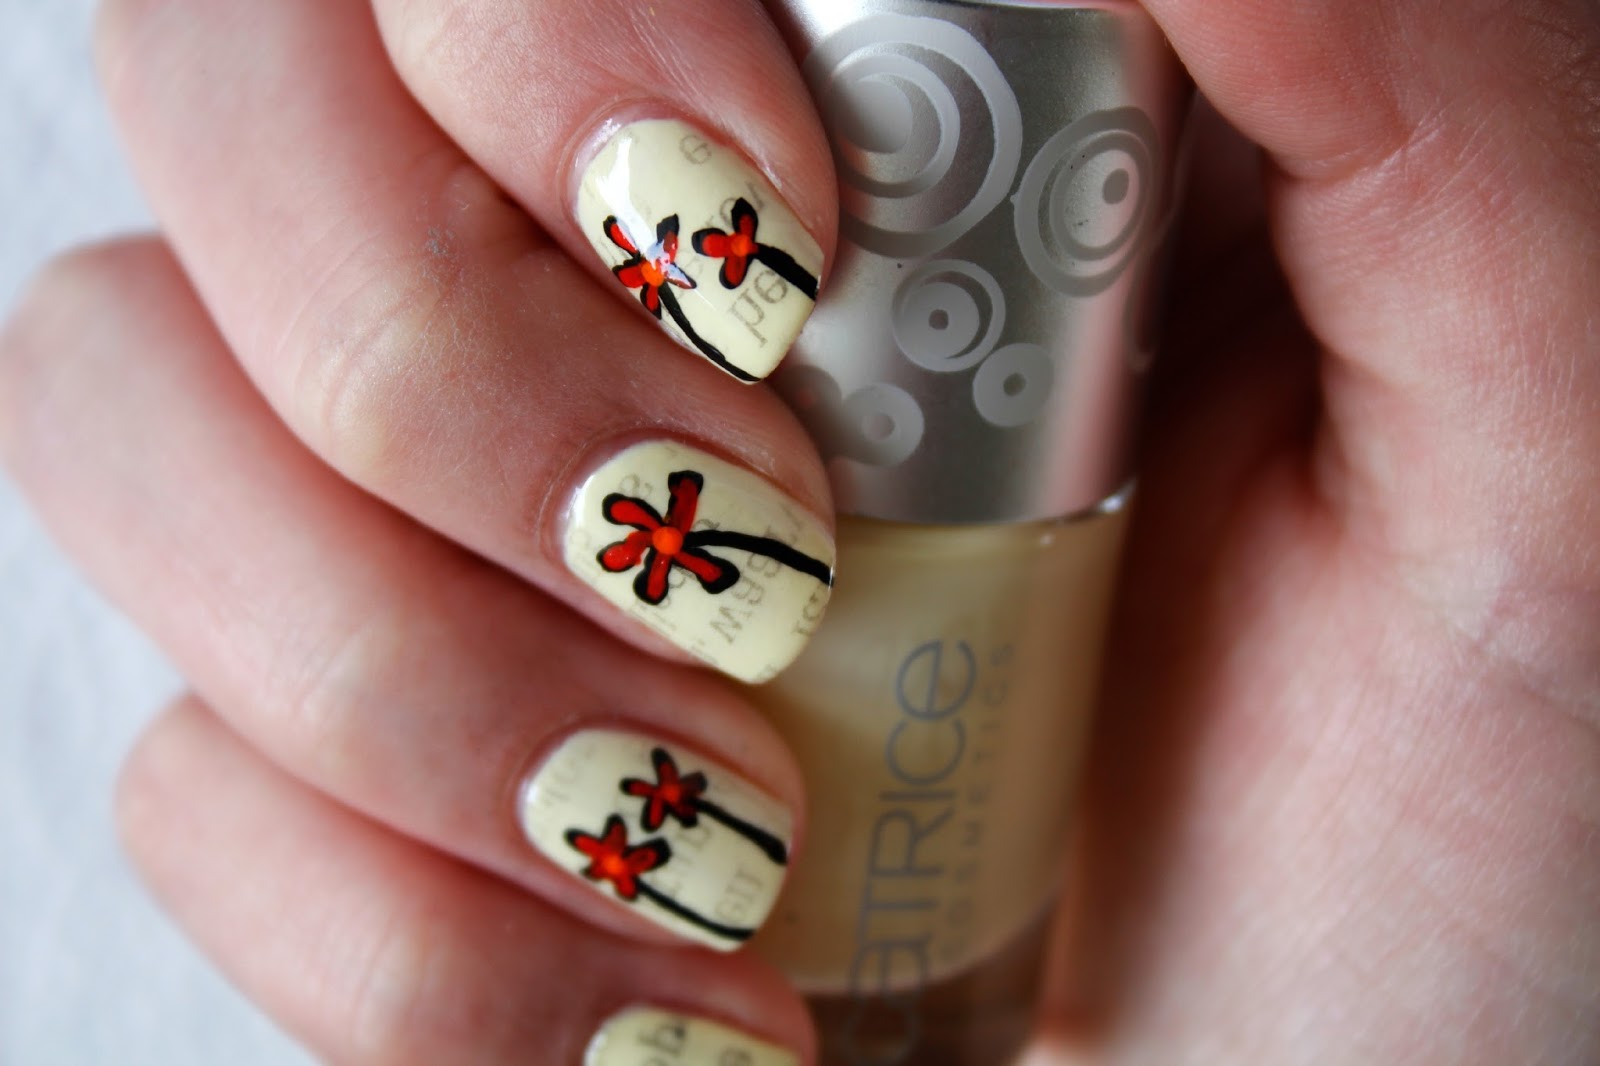
#2 Newspaper nails with cartoon flowers

My new howto: Newspaper nails with cartoon flowers!

I used acrylic paint for the cartoon flowers. You can use normal nail polish of course. I just think little designs like these are easier painted on nails with acrylic paint. The news paper technique really makes this design stand out much more!

If you click right here you will go to my Youtube channel to wacht the tutorial!

The colors I used are listed below:

 Nail polishes: 
- Base coat
- A pastel Yellow: Vanille love by Catrice
- Top coat

Acrylic paint:
- Black, red and orange paint 


  Hope you liked this DIY!

Jul 28, 2013

#1 Simple flower

My first ever tutorial video!


This is a real easy and fast design. You can paint all your nails this way or the way I did with a accent finger.

If you click right here, you will go to my youtube channel to watch the how to! 

The colors I used are listed below:

- A base coat,
- Blue coat. I used Denim Moore by Catrice
- Pastel yellow coat. I used Vanilla Love by Catrice
- Any glitter polish. I used a glitter polish by Miss Sporty
- A white coat
- Black polish. I used a black polish by NYC
- and finally a top coat


Jul 22, 2013

First blog on Dutchnailss!

A small introduction to begin this blog,

My name is Aletha, I'm nineteen years old and I live in the Netherlands. Since a while I'm really into painting and decorating my nails. I always loved to paint my nails in the weirdest colors but not in really complicated designs.

A while back I found a video on Youtube of somebody doing Watermarble Nails. And I LOVED it! I immediately wanted to try this technique for myself. And I did...; A whole afternoon spent doing my nails and getting the result I wanted. I never thought it would take so lang to do. But I didn't mind, I just loved being busy with my nails.


After wachting multiple watermarblenail how-to's I started wachting more and more nailart videos. Every single design I wanted to try for myself. And in the meantime my stash of polishes kept growing. Two days ago I was asked to do the nails of two sisters for a wedding. I was kinda nervous to do that at first, the only nails I had painted other than my own were the nails of my sister. After thinking about it I said yes and I ended up doing the nails of three girls! They were all so happy with their nails. The fact that I made them so happy by doing their nails made me happy and gave me the final push to start this blog.

What I will post on this blog are my tutorials on the design I painted on my nails. These tutorials will also be uploaded on my Youtube channel: http://www.youtube.com/user/Dutchnailss but on this blog I will post the names of the products I used in every video!

If you want to see designs before they will be posted on Youtube, you can follow me on Instagram: @Dutchnailss